Gaming PC Turns On But No Display? Complete Troubleshooting & Repair Guide
Gaming PC powers on but shows no signal? Learn the real causes, step-by-step fixes, and when professional diagnostics are the smart move.
Table of Contents
You press the power button. The fans spin. RGB lights up. Everything sounds normal — but the monitor stays black.
This issue is one of the most common and frustrating problems gamers face. The good news? In many cases, it’s something simple. The bad news? Sometimes it involves deeper hardware failure.
Why Your Gaming PC Has No Display
When a computer powers on but doesn’t show video output, the issue usually falls into one of these categories:
1. Graphics Card Issues
- Improperly seated GPU
- Loose PCIe power connectors
- Failing graphics card
- Driver corruption after update
According to industry repair data, GPU-related problems account for nearly 35% of no-display cases in performance systems.
2. RAM Problems
- Unseated memory modules
- Faulty RAM stick
- Incompatible memory configuration
Even one bad module can prevent POST (Power-On Self-Test), resulting in a black screen.
3. Monitor or Cable Failure
This is more common than people think. Faulty HDMI/DisplayPort cables or incorrect input selection cause a significant percentage of “no signal” scenarios.
4. Power Supply Problems
If your PSU cannot deliver stable power to your GPU, the system may power on without outputting video.
5. BIOS or Motherboard Errors
Corrupt BIOS settings, failed updates, or motherboard component damage can block startup display entirely.
Step 1: Quick Checks Anyone Can Do (5 Minutes)
- Turn off both PC and monitor completely.
- Replace HDMI or DisplayPort cable.
- Confirm monitor input source matches cable port.
- Plug cable into graphics card — not motherboard video port (unless using integrated graphics).
- Test monitor with another device.
Nearly 30% of cases are resolved at this stage.
Read: Why Gaming PCs Suddenly Slow Down
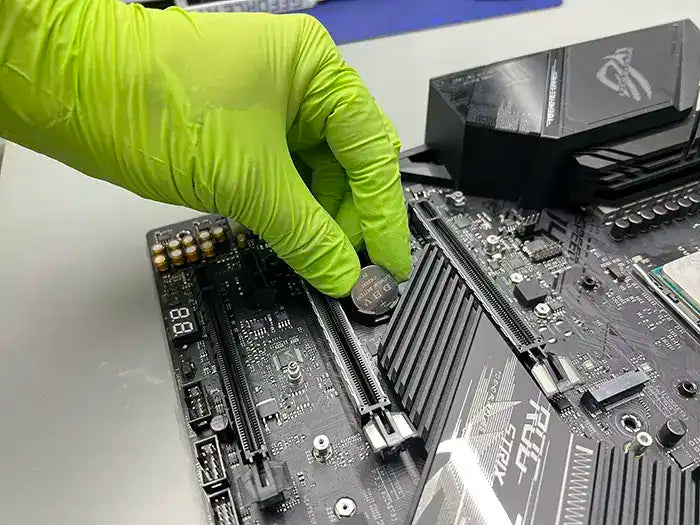
Step 2: Check GPU and RAM (10–15 Minutes)

Reseating the Graphics Card
- Power off and unplug system.
- Remove GPU carefully.
- Clean gold contacts gently with isopropyl alcohol.
- Reinstall until PCIe latch clicks.
- Reconnect all power cables.
Testing RAM
- Remove all memory sticks.
- Install one module in recommended slot (usually A2).
- Test boot one stick at a time.
If system boots with one stick but not another, you’ve identified the faulty module.
Step 3: Advanced Diagnostics
If basic troubleshooting fails, deeper testing may be required:
- Clear CMOS (reset BIOS)
- Test with known-working PSU
- Swap graphics card
- Check motherboard debug LEDs
- Inspect for capacitor damage
Important: Repeated forced startups can worsen component failure.
Know the Warning Signs
Learn how to spot liquid damage before it affects performance.
Read: Liquid Damage Warning Signs
Common Mistakes That Make Things Worse
- Using low-quality power supplies
- Forcing RAM into wrong slots
- Ignoring overheating symptoms
- Repeatedly restarting a failing system
- Updating BIOS without stable power
These mistakes can convert a minor fix into a major repair.
Preventive Maintenance Tips
1. Clean Internally Every 4–6 Months
Dust buildup increases thermal stress and GPU failure risk.
2. Use Surge Protection
Voltage spikes shorten PSU and motherboard lifespan.
3. Monitor Temperatures
Keep GPU below manufacturer-recommended load thresholds.
4. Avoid Aggressive Overclocking
Unless cooling and PSU capacity are sufficient.
Real Repair Experience & Professional Insight
After 25 years working hands-on with computer hardware — and owning a repair business — most no-display situations fall into two categories: simple connection errors or early-stage hardware failure.
In one recent case, a high-end custom gaming build arrived powering on but showing no video. The issue wasn’t the graphics card as suspected — it was a failing power supply that could not sustain stable voltage under GPU initialization. Replacing the PSU restored full functionality.
Another system showed intermittent black screens during startup. Diagnostic testing revealed a single defective RAM stick causing inconsistent POST behavior.
Experience matters in diagnosing these issues quickly and accurately. Proper testing tools, thermal analysis, and power delivery measurement eliminate guesswork and prevent unnecessary part replacements.
Not Sure What’s Causing the Issue?
If your system still refuses to display video after these steps, the smartest move is a proper diagnostic. Professional testing prevents unnecessary part replacements and ensures accurate repair decisions.
Our team performs structured hardware diagnostics, power testing, GPU validation, and motherboard inspection using professional-grade equipment.