Best Way To Update Bios - All You Need to Know

To stay ahead in this world of technology, you need to get the maximum potential of your hardware. The main component for this is the BIOS. It is a digital gateway to unleash improved performance and compatibility for your PC.
But how will you navigate this complex process of BIO update safely and securely? If you want to learn the best way to update your BIOS, you came to the right place. Let’s unravel the secrets to effective BIOS update together!
- Ways To Update Bios
- Update Using The Bios / Uefi Interface
- Utilize Bios Flashback
- Employ Windows Software For Updating
- Checking Your Current Bios Version
- Open The System Information Application
- Search For Bios Version / Date On The Right Side
- Before You Begin Updating: Make A Note Or Take A Screenshot Of Your Settings
- How To Locate A Bios Update File
- Locate The File On The Manufacturer's Support/Downloads Webpage
- Download The Most Recent Stable Version
- Extract The File From Its Compressed Format
- Updating Your Bios Using Uefi Setup
- 1. Save The Bios File To A Usb Flash Drive
- 2. Pause Bitlocker Encryption
- 3. Restart Your Computer And Access The Bios Settings
- 4. Switch From The Simple To Advanced Menu Mode
- 5. Find The Update Menu And Open It
- 6. Pick The Bios File From Your Flash Drive
- 7. Confirm By Clicking "Yes"
- Updating Your Bios With Bios Flashback
- 1. Download The Bios Update File
- 2. Give The Bios File A New Name
- 3. Transfer The Bios File To A Usb Flash Drive
- 4. Ensure The Computer Is Powered Off But Connected To Power
- 5. Insert The Flash Drive Into The Dedicated Bios USB Port
- 6. Activate The Bios Flashback By Pressing The Button
- How To Perform A Bios Update Using Windows Software
- Final Verdict
- FAQs
- Is it good to update BIOS?
- What happens if BIOS update fails?
- Why is it so risky to update BIOS?
Ways To Update Bios
There are mainly three types of well-known methods of updating the BIOS. These methods are subjective to the suitability of your scenarios. The methods of the updating include Update Using the Bios / UEFI Interface, Employ Windows Software for Updating and Utilizing Bios Flashback.
• Update Using The Bios / Uefi Interface
To update your BIOS via using the BIOS interface. You first need to ensure that there is a file of update in a USB or external storage device.
The first step is to plug in the storage device a make sure that the data is accessible. Then enter into the boot of PC’s and toggle the menu of BIOS interface. In the menu look for the option of BIOS update, this will automatically retrieve the update from the flash drive.
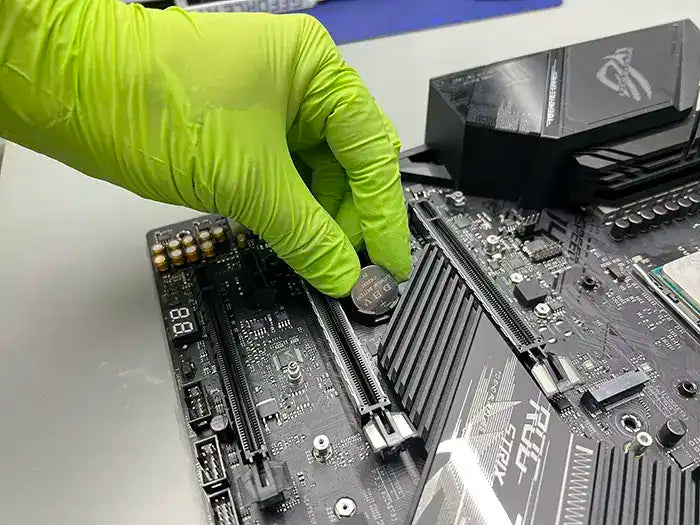
• Utilize Bios Flashback
The flashback BIOS updating method is usually compatible with the hi-end motherboards. The flashback method allows you to update the BIOS without even entering in the boot mode. The BIOS can be updated by attaching a USB directly to the motherboard and allow it to get connected.
Once you see that there are lights emerging from the USB, it means that the device is ready. This type of BIOS updating is ideal in the cases where you are looking to update the BIOS without the presence of the CPUs.
The flashback method is also suitable when your CPU doesn’t work with your current BIOS. Then the flashback method allows you to update the BIOS and ensure that the CPU becomes compatible.
• Employ Windows Software For Updating
This is one the simplest methods to update your BIOS. The updating of BIOS by windows software allows you to make an update through the operating system itself.
This type of updating method is convenient but there are higher chances of errors. The error might occur if the windows itself goes corrupt while updating the BIOS. This will cause significant problems for your motherboard
Checking Your Current Bios Version
It is important for you to identify the current BIOS version before updating to a newer version. The reason behind this is that the make and model of the motherboard are compatible with specific versions of the BIOS.
So, if you want an error free update. You always have to identify the current version of your BIOS correctly.
• Open The System Information Application
This is one of the simplest ways of identifying your current version of the BIOS. The information app on the computer has all the basic information available on it.
This information allows you to obtain the vital information which you might be looking for. The app information also provides the information on the current BIOS version
• Search For Bios Version / Date On The Right Side
The first step is to launch the app and search for about system. In the system summary option, you will be able to find your BIOS version.
But this method might not be fully accurate as the OS might not provide you with the right code. To identify the correct code, you can directly go to the BIOS interface.
Before You Begin Updating: Make A Note Or Take A Screenshot Of Your Settings
The BIOS updating wipes out all the existing settings that you have made in the interface. These settings can be related to the clocking speed or RAM settings.
To ensure that you have a track and record of these settings. You can always take a screenshot of these settings before updating the BIOS.
There is a simple way to take a screenshot of the settings. To take a screenshot, plug in a USB drive and press F12 key. This simple step will take a screenshot and save it in the USB.
How To Locate A Bios Update File
In the process of updating your BIOS. Identifying and finding the right file are very important. If the finding and sourcing of the file of update is not right, you might face some serious problems related to your motherboard.
• Locate The File On The Manufacturer's Support/Downloads Webpage.
The manufacturers are one of the most authentic sources of downloading update files. To locate the file from the manufacturer webpage.
You can simply go to the customer support page and find the option of driver and tools. You will find the update file under the section of the drivers and tools.
• Download The Most Recent Stable Version.
It is important for you to download the latest version available for your BIOS update. The manufacturer should have a long list of the drivers and tools available for you to download.
In the list of the options, you might also find beta versions of the BIOS. The beta versions are the updates that are still on trial basis. Thus, always download the version that was launched before the beta version.
• Extract The File From Its Compressed Format.
The update files need to be in their actual size before you proceed with the updating. The update files are usually downloaded in a zip folder format. The zip folder reduced the size of the entire file by compressing it. It is important to unzip the file before proceeding with the installation.
Updating Your Bios Using Uefi Setup:
There are a number of steps which you can follow to update your BIOS with the help of UEFI setup. These steps should always be followed in a sequence to ensure that the update process remains successful and doesn’t result in problems in the future.
1. Save The Bios File To A Usb Flash Drive.
The first step of updating the BIOS by using the Uefi setup is to copy the files to USB flash drive. It is important to ensure that the flash drive you’ve selected should be a FAT32 partition USB.
2. Pause Bitlocker Encryption.
The suspending of bit locker when updating the BIOS holds immense importance. The suspending of the bit locker ensures that your data is not being lost when you are updating the BIOS.
If you forget to suspend the bit locker It is possible that the encryption will be still searching for the old BIOS. Once you have successfully suspended the bit locker and updated the BIOS. You can turn the bit locker back on the enabled option.
3. Restart Your Computer And Access The Bios Settings.
To access the BIOS settings there is a simple way which you can use. This simple way allows you to enter in BIOS settings without any complications. Simply, press the F2 key as soon as your computer comes on the start screen.
4. Switch From The Simple To Advanced Menu Mode.
There are two modes in the menu mode which are advanced mode and the easy mode. The easy mode shows you less options and the interface remain very basic.
Whereas the advanced mode shows you a greater number of options. If you are looking to get in to advance mode from the basic mode, hit the F7 key.
5. Find The Update Menu And Open It.
The BIOS menu has an extended option for the initiation of the update. The update button can be found in the menu under different names.
These names are subjective to the manufacturer and the OS in your system. The most common name under which the update menu is called is flash. However, companies like ASUS list it as EZ flash and MSI List it as M-Flash.
6. Pick The Bios File From Your Flash Drive.
This step only includes the selection of the files from the flash drive. You will see a drop-down menu which will list all the files available in the flash drive. You just have to carefully select the BIOS update file
7. Confirm By Clicking "Yes."
Press “YES” to start the update. Once the process is complete, you will see a confirmation message and the system will restart on its own.
Updating Your Bios With Bios Flashback:
Accessing the BIOS/UEFI menu on your computer may be difficult in some circumstances. When dealing with motherboard compatibility issues, particularly when a BIOS update is necessary for support of newer-generation CPUs, this becomes clearer.
For example, many AMD motherboards with AM4 socketsmight not start the boot process using a CPU that is newer than the generation for which the board was made.
Practically speaking, a motherboard with a B350 or B450 chipset may require a BIOS update before working without a hitch with a Ryzen 5000 processor.
Using a 13thGen CPU with an Intel 600 series motherboard can cause similar compatibility issues. It's crucial to remember that this is not a common situation. Some motherboards that were delivered later can come pre-installed with an updated BIOS.
This problem has a remedy in the shape of BIOS Flashback. Although it's not a standard feature on all motherboards, it enables users to update the BIOS without installing a CPU or booting the machine by utilizing a USB flash drive.
Although different motherboard manufacturers may refer to this capability by different names—Gigabyte, for example, calls it Q-Flash Plus—the underlying technique is the same in all of these implementations.
1. Download The Bios Update File.
The manufacturer's Bios update file must be downloaded. You must perform the bios flashback on a working PC if you need it on one particular computer.
The motherboard must provide the most recent firmware version. Most of the files included in this package are compressed. It includes the files required for BIOS update.
To ensure maximum security and dependability, you must do this. Additionally, you need to have access to the release notes to ensure compatibility.
2. Give The Bios File A New Name.
Renaming the bios file is important. The majority of the manufacturers need a basic name that does not have the version number. So, there can be utility file in the download that renames the Bios file.
You need to rename the file due to many reasons. The BIOS files are stored in the system with the default file names. These file names are mostly system decided names which are hard to identify. It is important that you always change the name of the file to improve its identity for yourself. Once you have renamed the file it makes finding the file easier.
As you might need the file in updating and recovery process. The renaming of the file is important because the updating of BIOS requires exact files which are needed for the updates. If you end up selecting the wrong file, you might face bad consequences in the future.
3. Transfer The Bios File To A Usb Flash Drive.
You need to then transfer the bios file to a USB flash drive. The format needs to be FAT32. It is important to do this due to many reasons. These reasons are stated below:
•Offline BIOS update
You need to be offline as updating BIOS need the system to be offline. This means that your PC is not booted or in action. The BIOS manages the hardware itself. It also manages the basic functions of the system. So, updating BIOS cannot be executed when the system is online
•BIOS flashing utility
The motherboards of your PCs mainly come with the BIOS utility as built in. This utility is made to read the file from USB or flash drives. Then it updates the firmware of the motherboard.
•Avoiding operating system reliance
When you transfer the BIOs file from the flash driver, it enables the update process to be independent. It doesn’t include the use of the operating system of the PC. The BIOS update occurs at a very low level. It is not reliant on any system
•BIOS recovery
Sometimes, the BIOS update can fail. In that situation, having the BIOS file on a USB or flash drive can be useful. It will allow recovery. So, if the BIOS corrupts while updating, the motherboard can recover. This includes reading from the BIOS file from the USB.
•Safety and stability
Updating the BIOS comes with some risks. But having this file on a USB drive can offer a safe method which is also stable. It decreases the chances of errors during updating BIOS.
•Convenience
Using a USB flash drive is an easy and practical alternative. Most current motherboards contain dedicated USB ports, making it straightforward to transfer files to USB drives. It's a simple strategy that doesn't call for highly developed technical knowledge.
•Compatibility
Motherboards are among the many devices that USB flash drives are widely compatible with.
So, the BIOS file is guaranteed to be portable and usable as a storage media for BIOS upgrades across many computers
4. Ensure The Computer Is Powered Off But Connected To Power.
To ensure that BIOS update is initiated successfully. You have to ensure that the system is completely shut down but simultaneously it is connected to the power supply.
The process of doing this is divided into four major parts. In order to mitigate the risk of interference it is important that your system is powered off. Turning off the system also ensures that there is absolutely no data loss.
The power supply is mandatory even if the system is shut down because the BIOS updating always requires power supply for the motherboard. The power supply ensures that the process of updating remains uninterrupted.
5. Insert The Flash Drive Into The Dedicated Bios Usb Port.
Using flash drive is an important part of updating BIOS. The reason for its significance includes:
•Isolation and precision
The BIOS ports are made to make sure that it's isolated from other USB ports. As it reduces the possibility of interference or data damage from external devices, this isolation is essential throughout the BIOS update process.
•Individual recognition
Utilizing a non-dedicated USB port can result in issues, hence this particular recognition helps users identify the proper port for the flash drive.
•Streamlined communication
It is easier to communicate between the motherboard and the flash drive when there is a dedicated USB port in the BIOS. Firmware upgrades benefit from this direct connection's optimization, which guarantees a reliable and effective data transmission process.
•Minimizing errors
Specialized BIOS bypass additional USB hubs or controllers, reducing the possibility of failure or mistakes during data transfer. This targeted strategy lessens the possibility of disruptions that can risk the BIOS upgrade.
6. Activate The Bios Flashback By Pressing The Button.
Activating the BIOS flashback feature requires pressing the button on the motherboard. This step is very important because of many reasons. Some of the reasons are mentioned below.
|
Safe firmware restoration |
· It allows users to restore the firmware to recover from a failed update. |
|
Eliminating the need for a CPU |
· It doesn’t need a CPU to be installed. |
|
Independent firmware update |
· Activating the flashback needs independent firmware. The motherboard gets to the BIOS file from flash drive. This improves reliability. |
|
User friendly operation |
· It makes the entire processes user-friendly. It decreases the complex methods for updating BIOS. It requires less technical skills. |
|
Real time feedback |
· BIOS flashback consists of LED and other visuals that offer feedback in real time. You can keep a check on the progress in this way. |
How To Perform A Bios Update Using Windows Software
While using a windows software to perform a BIOS update includes the official utility of the manufacturer. You can execute this procedure in the following ways.
- Identify the motherboard. This means to understand the model of the motherboard. This is helpful for getting accurate BIOS update.
- Visit the website of the manufacturer. You can go to the official website to download sections
- Download the BIOS update utility. You can locate the BIOS update for the particular model you have. You can then download the recent version present. This will make sure that you download the accurate version.
- Checking the system compatibility. Before starting the update, you must confirm that the update utility is compatible with the windows software.
- Run the update utility. After downloading the utility, you can now execute the file. And then follow the on- screen prompts offered by the program.
- Initiate the update. Now, you need to select an appropriate file and then let the utility proceed with the update.
- Wait for its completion. To guarantee a seamless update, you need to wait and do not interrupt the process in any way and by any means. This will ensure a smooth update.
- Restart your PC. After the update is completed, you need to restart your PC as it will then reboot.
- Confirm BIOS update. After restarting your PC, you need to verify the positive BIOS update.
Final Verdict
It can appear easy to update the BIOS. You must, however, maintain complete focus and accuracy when implementing the update's instructions. You aren't allowed to make mistakes because doing so could lead to a variety of issues.
You should always identify the model and version of your BIOS. Identification is important because not all versions of BIOS support each other. Lastly, always read the pros and cons of updating the BIOS. If you feel like there are more advantages for you if you update the BIOS, only update it.
FAQs
Is it good to update BIOS?
The updating of BIOS has both pros and cons. The benefits of updating the BIOS include improvement in the system. This improvement might include security patches, bug fixes and performance-related improvement.
The updating will also provide support for newer models of hardware. The updating of the BIOS will allow your system to become compatible with the new hardware that you are looking to upgrade.
On the other hand, the cons of updating include: Your data can be lost while updating the BIOS. The failed attempt to update the BIOS might permanently damage your motherboard which can then only be replaced with a new one.
What happens if BIOS update fails?
The failure is something that you might experience when updating the BIOS. The failure in update can result in a bricked system. When your system is bricked, your system fails to respond to any sort of command. The system will fail to restart or respond to anything. The second thing that can happen is a complete loss of data.
The failure of BIOS update might result in the popping up of error messages. These error messages will show you the error codes which might be hindering the update process. All the cases of failure will force you start the updating process from the scratch
Why is it so risky to update BIOS?
The process of BIOS updates is risky because the probability of making a human error is relatively high. Once you have made the error, you might have to face serious consequences. These consequences might include loss of data, loss of motherboard and starting the process from the start.