How to Clean Gaming PC Like a Pro

Image Source: Prime Tech Support
If you are a game lover, then you'll understand the phrase “Dust is the enemy” Well, yes, it is, it will cause overheating damaging your PC’s components and can affect the performance. Don't worry; we've poured all our decades of knowledge here to show you how to prevent this problem like a real pro.
Table of Contents
- Why Is It Important To Clean Your Gaming PC?
- 7 Steps to Clean Gaming PC Like a Pro
- Step 1: Gather Your Supplies
- Step 2: Disconnect your PC: Safety First!
- Step 3: Open Your PC Case: Be Careful Not To Damage Any Components
- Step 4: Clean The Fans
- Step 5: Clean the Case
- Step 6: Clean The Heatsink
- Step 7: Close Your PC Case
- Deep Cleaning Your Gaming PC
- Thermal Paste On CPU:
- RAM sticks
- Gaming PC Cleaning Frequency: How Often Should You Clean Your Gaming PC?
- Gaming PC Cleaning Schedule: How To Create A Cleaning Schedule For Your Gaming PC
- Conclusion
- FAQs
- How Do I Keep My Gaming PC Dust Free?
- Articles You Might Be Interested In
Why Is It Important To Clean Your Gaming PC?
Imagine your PC as a car. If you never wash it or change the oil, it won't run well, right? Same goes for your Gaming unit. Dust and dirt can slow it down or even damage it. Cleaning it is the only way to prevent this.
7 Steps to Clean Gaming PC Like a Pro
Step 1: Gather Your Supplies
- The first step is to collect all the tools which will help you in cleaning your PC. You must be thinking: What are the best tools for cleaning my gaming PC? You need a couple of cleaning supplies. Here is the list of cleaning supplies:
- Microfiber cloth: Perfect for wiping sensitive areas.
- Isopropyl alcohol (99%): it is particularly important not to use any other liquid as if anything that isn't dielectric touches any electric component static energy on your body or tools can easily damage electrical components.
- Cotton swabs: These can help you clean those tight spots.
- A blower or a Compressed air can.
- ESD brush.
- Gloves
- Screwdrivers.
- ESD wristband connected to ground.
- A place to organize your screws and parts.
Step 2: Disconnect your PC: Safety First!
Before you dive into cleaning, ensure your safety:
Power off your PC and disconnect it from the electrical outlet. This is crucial for your safety. To avoid static discharge, use the ESD wristband connected to the ground.
Step 3: Open Your PC Case: Be Careful Not To Damage Any Components
Now, let's get inside your PC. Use your screwdriver to carefully remove the side panel of your PC case. Be gentle, you don't want to damage anything or lose any of the screws that hold it together. Once you've removed the side panel, you'll have easy access to the components.
Source: Prime Tech Support
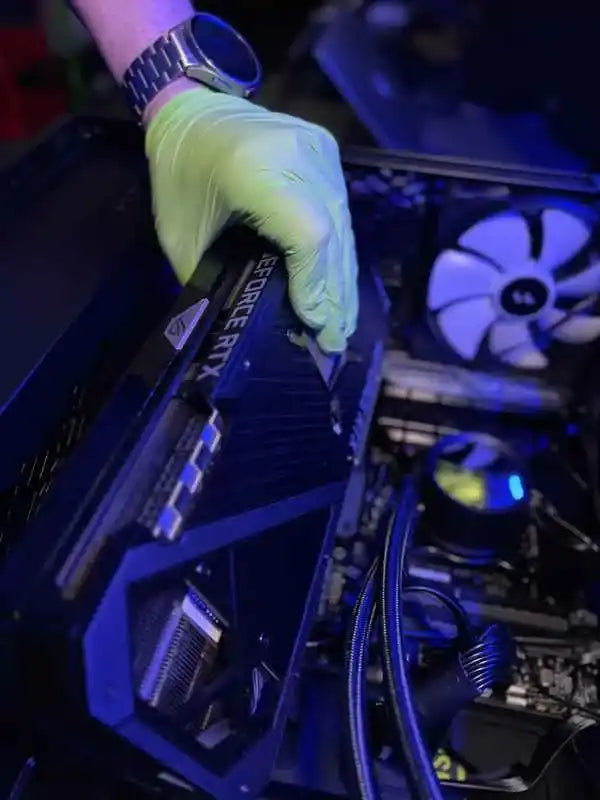
Also remove any component that you can detach with ease, as experts we can tell you that’s better to not move any cable or things connected to your motherboard as the pain of restoring the cable management could be a lot worse than the one whatever little dust you can't reach over there. be careful not to touch electrical contacts or parts, grab everything using gloves and in the case of the GPU and RAMs grab them by their case like this:
Step 4: Clean The Fans
Dust will stick to your PC's fans, causing them to slow down and get noisier. Without disconnecting them from the motherboard give each fan a gentle blast of air to blow the dust away. Hold the fans still with your fingers while you do this. We don't want them spinning around.
Step 5: Clean the Case
Grab your microfiber cloth. Make sure to get into every nook and cranny where dust likes to hide.
Now, if you come across any stubborn spots that are hard to remove, it's time to bring out the secret agent: a bit of isopropyl alcohol. Dampen a small section of your cloth with just a smidge of alcohol and use it to deal with those persistent sports. Remember, we're not going for a drenched cloth here – just a hint of alcohol.
Step 6: Clean The Heatsink
Blow it away with compressed air. For a deep clean, remove the fan and heatsink.
Step 7: Close Your PC Case
After cleaning, carefully put the side panel back on and screw it in. Reconnect all the cables.
Deep Cleaning Your Gaming PC
Consider taking off significant parts like the graphics card and RAM modules for an even thorough clean. Utilizing the previously described tools, clean each component separately. To avoid voiding warranties or harming delicate components during disassembly and reassembly, use caution and refer to your PC's handbook.
Every few months or at least once a year clean these:
- Thermal paste on the CPU
- RAM sticks
- We recommend reaching a professional to clean your Graphics card thermal pads and paste as well as the power source.
Thermal Paste on CPU:
Source: Prime Tech Support
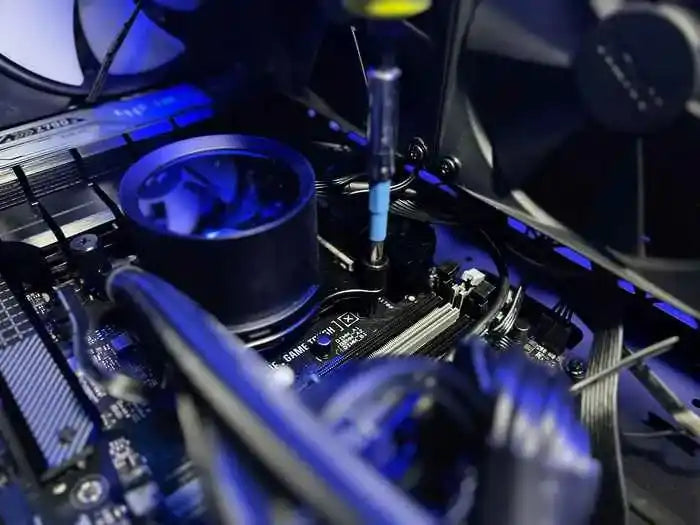
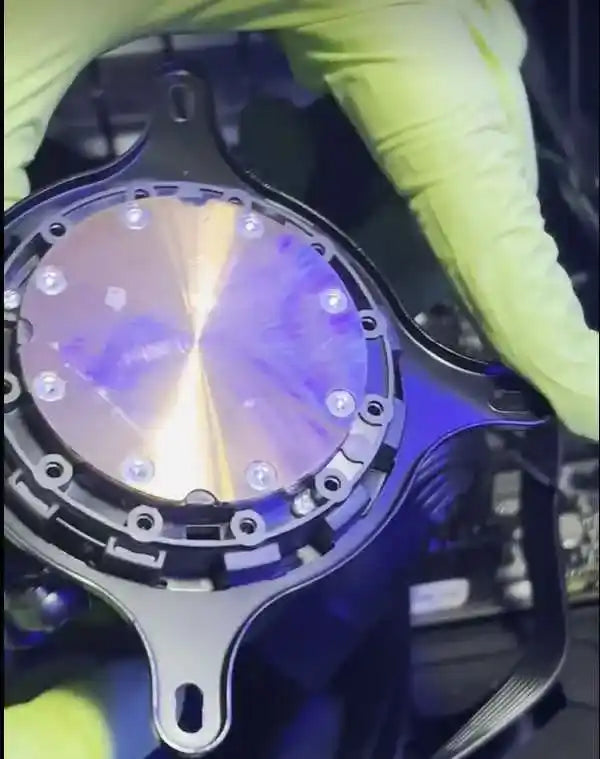
1. Go ahead and remove the CPU cooler. Most are mounted to the motherboard secured with four screws that can be loosened by hand. Your cooler's design may differ, so consult the manual if you're unsure.
2. Once you've removed the mounting screws, twist the cooler back and forth to break the seal. Mine detached easily, but you might need to twist it more to break the bond between the CPU and the cooler. Sometimes the person installing the cooler applied too much thermal paste in the past, making it harder to remove. Don't force it; patience is key.
Source: Prime Tech Support
3. Once the cooler is off, take a dry microfiber cloth and wipe off as much of the old thermal compound from the cooler as possible. Some prefer to use alcohol right away, but I find a dry wipe to be cleaner initially. Next, moisten a new piece of microfiber cloth with alcohol and clean the cooler until it shines.
4. Do the same for the CPU, but with an additional step. If you have them, use a cotton swab. If not, a microfiber cloth will work. Moisten the cotton swab with alcohol but ensure it's not dripping wet. While it's unlikely to damage your components if there's a little drip, conductive thermal paste could cause problems if it seeps into unintended areas and the alcohol evaporates.
5. Clean the sides of the CPU with the swab, and then give the top of the CPU one final wipe. It should look immaculate with no streaks or residue, ready for the new thermal paste. If the Thermal Paste of your choosing is a conductive paste. It's crucial to be cautious as this can short out components if misplaced. There are various methods for applying thermal paste.
If you're unsure about how much thermal paste to squeeze out of the tube, it's better to apply a tad extra. When you install and fix the cooler, the pressure will spread the thermal paste. Applying too little is worse, as the required amount is usually just a pea-sized dot. Under the pressure of the heatsink, any excess thermal paste will get pushed beyond the edges of the CPU surface.
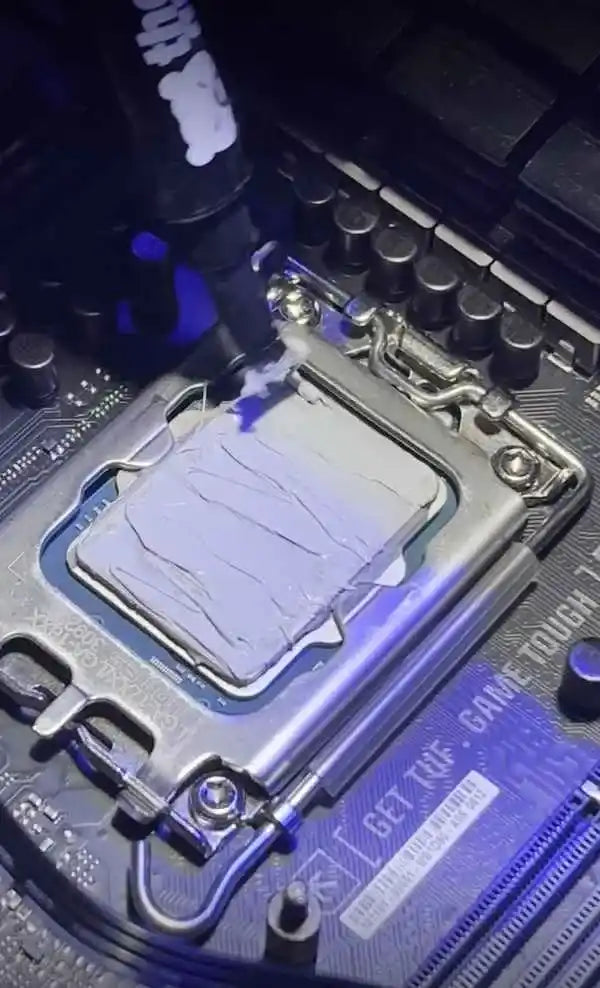
Source: Prime Tech Support
to apply it, spread the thermal paste evenly over the entire CPU surface. This is the most effective way to apply the paste. However, it might not always be the most convenient. For instance, we recommend you use the Thermal Grizzly Kryonaut and the Arctic MX4 thermal paste. If there are specific instructions provided with the thermal paste, it's wise to follow them. If none are given, apply as you usually would.
Once you've applied the paste, you're ready to reinstall the cooler. Some coolers, like the stock AMD one, may not sit flush, which can result in uneven coverage. Have your mounting screws ready and place the cooler as flatly as possible while applying moderate pressure. It doesn't need to be forceful, just enough to hold it in place. Reattach the screws in a cross pattern, moving from one corner to the opposite corner and tighten them just until you encounter resistance.
RAM Sticks
All RAM slots have a locking mechanism to keep the RAM sticks in place. Some motherboards have both top and bottom locks, while some feature just a single lock.
To remove the RAM sticks, you simply must push these locks outward, and the RAM sticks will pop out. For a single lock, just push the lock outward, and one side will pop out. For double locks, push both locks outward. Doing so will cause the RAM stick to pop out from both sides. Just softly pull the RAM stick out, if it doesn’t come out easily it means that it isn't correctly unlocked.
One common mistake on PC cleaning is being too rough with the components, newbies often break ram sticks this way, every component on your Gaming PC is fine tune by the manufacturer to be delicately removed, if it does not come out this way then something is still holding it in place.
Proceed to softly clean your ram with a cotton swap dampened with alcohol.
Now, to place it back, start by opening the RAM slot locks. Align the notch of the RAM sticks with the slot on the motherboard. Place your thumbs on both ends of the RAM stick and push it downward. You should hear a click from the locking mechanism of the RAM slot, indicating that it is plugged in correctly.
Gaming PC Cleaning Frequency: How Often Should You Clean Your Gaming PC?
The frequency of cleaning depends on several factors, including the environment and usage. Deep cleaning is advised every three to six months. However, more frequent cleaning may be required to maintain maximum performance if your gaming setup is in an area that is especially dusty, or you have pets around.
So, the cleaning frequency depends on factors like your environment and usage. Here is a general guideline:
- For a dusty environment or heavy usage: Clean every 3 to 4 months.
- For a clean environment or moderate usage: Clean every 6 to 12 months.
Our professional opinion is to do a deep maintenance to your pc every six months, in prime tech support you'll find a trough hardware cleaning and software maintenance, this will resolve any hidden issue that might otherwise go unnoticed.
Gaming PC Cleaning Schedule: How To Create A Cleaning Schedule For Your Gaming PC
Establish a cleaning plan that is specific to your usage to guarantee consistency. A thorough cleaning should be done every few months, while quick maintenance chores like dusting should be done every week. Dusting frequently keeps your gaming PC functioning smoothly over time and stops dust accumulation from getting excessive. Keep in mind that regular maintenance not only improves a gaming PC's performance but also lengthens its lifespan, guaranteeing endless hours of uninterrupted gaming fun.
Conclusion
Maintaining your gaming PC's health is essential for optimal performance and longevity. While cleaning and upkeep can be a DIY task, trusting professionals ensures a thorough and safe process. For all the gamers in the Miami, Florida area, we invite you to take advantage of Prime Tech Support's specialized Gaming PC Cleaning and Maintenance service. Our team of experts is equipped with the right tools and expertise to provide impeccable care for your prized gaming rig. Enhance your gaming experience and extend your PC's lifespan with our tailored services. Check out our offerings and schedule your session today at Prime Tech Support Gaming PC Cleaning and Maintenance. Your PC deserves the best, and so do you!
FAQs
How Do I Keep My Gaming PC Dust Free?
Employing dust filters can significantly reduce dust buildup. Regularly cleaning or replacing these filters and positioning your PC in non-carpeted, well-ventilated areas can also help reduce dust accumulation. Using a positive air pressure configuration, with more intake fans than exhaust ones, can also optimize airflow and minimize dust entry.